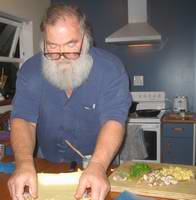
Step 1. Remove all the stalks and dodgy bits, chop where necessary, and apply the blender. Measure the blended tomato into a large saucepan. I have an 8 litre stainless steel saucepan with a heavy base.
Step 2. Next, tomatoes are kind of acid, but nowhere near as much as some other fruit. So, grab a couple of lemons and add the juice to the mix.
Step 3. Measure out a volume of sugar equal to the blended tomato and lemon juice and add to the mix, stirring over medium heat until it has dissolved.
Step 4. Turn up the heat to 8 or 9 out of 12, and go for it, for about 20-30 minutes, stirring all the while.
I found this jam didn't set the way my marmalade does; it comes out more like typical raspberry jam rather than a gel. I used the standard wrinkle test, for both batches I made, and that usually does the trick. However, it stayed on the knife and did not dribble while being transferred from jar to bread. (Thought — to perhaps try next batches with (i) a little less lemon juice, and (ii) a little more lemon juice.)
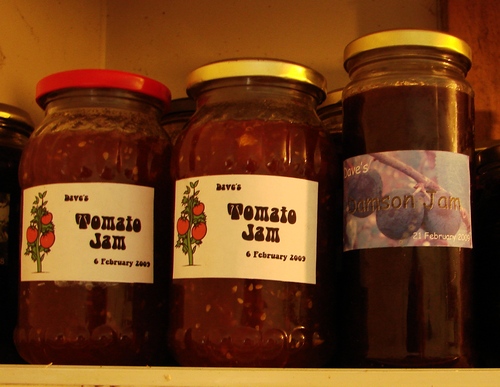
The taste is excellent, and will vary slightly depending on ratio of ripe fruit to green. It's recognisably tomato, though unlike any other tomato dish you're likely to have tried, unless, like my mum, you have served up chopped tomato sprinkled with sugar for dessert.
Pour the jam into jars that have been freshly cleaned, and heated for about 6 minutes in the microwave. 6 minutes seems to be fine for the number of jars that typically fit onto a microwave plate. Boil the lids in water for about 5 minutes. Clean the jars of spilled jam and put the lids on as soon as possible, and the cooling jam will create a vacuum seal.
Stirring: There are two schools of thought on stirring. One school maintains that excessive stirring breaks up the fruit particles unduly and causes cloudiness. The other school maintains that cloudy jam is infintely preferable to jam that has burnt on the bottom of the pot. I use a 75mm wide flat paddle with a straight bottom and stir slowly. The large flat surface is ideal for moving large quantities of jam around the pot as gently as possible.
Wrinkle Test: Place a china plate on the bench and with your wooden spoon, dribble a 50mm trail of jam onto the plate and leave it for 30 seconds. Push against the end of the trail with your finger. A jam that is ready to set will wrinkle ahead of you; a jam that needs a bit longer will simply move out of the way. Start testing around twenty minutes.